Aug 25, 2023
Save Time with Automated Account Reconciliation
- Manually reconciling accounts can be a time-consuming and frustrating process, often involving tasks like finding bank statements, referencing transactions, removing duplicates, and adding missing transactions.
- Automated account reconciliation, like the one offered by Equility, streamlines the process by integrating banking data, employing algorithmic transaction mapping, automatically identifying duplicate and missing transactions, and simplifying the entire workflow.
- To efficiently use Equility's account reconciliation feature, businesses can follow a step-by-step process, which enables businesses to significantly reduce the time and effort required for account reconciliation.
Efficiently reconciling financial accounts is a vital aspect of maintaining accurate and up-to-date financial records for any business. However, manually reconciling accounts, with its myriad tasks like finding bank statements, cross-referencing transactions, removing duplicates, and adding missing entries, can be a time-consuming and daunting process.
Fortunately, automated account reconciliation solutions like Equility offer a streamlined and efficient approach to this essential financial process.
This article explores how automated account reconciliation (aka bank reconciliation) can save businesses valuable time by integrating banking data, employing algorithmic transaction mapping, automatically identifying and addressing issues like duplicate and missing transactions, and simplifying the entire workflow.
Moreover, this article provides step-by-step best practices for using Equility's account reconciliation feature, empowering businesses to reduce the time and effort required for this critical financial task.
Table of Contents
- The benefits of being able to quickly and accurately reconcile your general ledger accounts
- Before Equility: 40-Minute Manual Bank Reconciliation
- After Equility: 3-Minute Automated Bank Reconciliation (!!!)
- Best Practices: Step-by-Step Reconciliation Instructions with Equility
The benefits of being able to quickly and accurately reconcile your general ledger accounts
Image not available
Ensuring that your accounts are reconciled properly is one of the first things that bookkeepers are taught. If you’re analyzing financials that are based on inaccurate debits and credits, then you’re already in a bad spot. When you’re using QuickBooks Online, your bank reconciliation issues might have arisen for a variety of reasons:
- Reconciliation is not up-to-date
- There are duplicate transactions
- There are missing transactions
Even if you know all of the rules to follow, you probably still run into the issue of how much time it takes to locate and fix these issues. This manual process includes:
- Finding bank statement
- Referencing every transaction on the bank statement
- Removing every duplicate transaction
- Adding every missing transaction
Properly completing a manual, 500+ transaction bank reconciliation is a pain in the a**! Which you can see very clearly in the video below.
Before Equility: 40-Minute Manual Bank Reconciliation
With Equility, the entire process mentioned above is automated, saving you time and providing an extra level of security — here’s how:
- Banking data integration
- Algorithmic transaction mapping
- Automatically find any duplicate transactions
- Automatically find and add any missing transactions
To see exactly how we transform a 500+ transaction bank reconciliation from a 40-minute chore into a 3-minute sprint, check out the video below.
After Equility: 3-Minute Automated Bank Reconciliation (!!!)
Best Practices: Step-by-Step Reconciliation Instructions with Equility
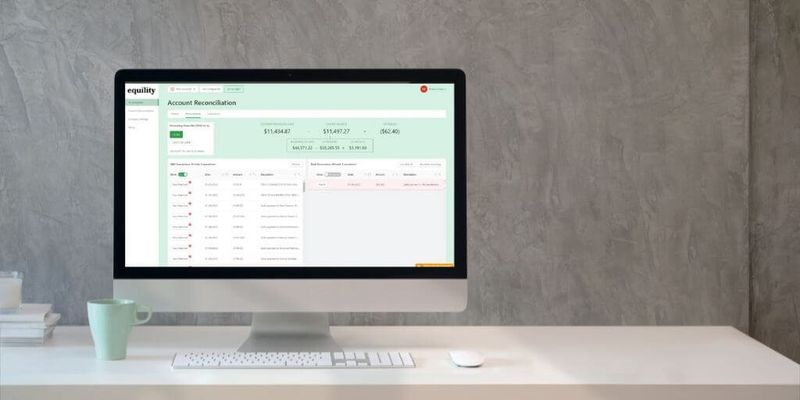
In order to properly reconcile an account within Equility, we suggest that you follow these best practices:
1. Download our plugin (Works on Chrome, Edge, Opera, and Brave)
- In order for our account reconciliation feature to work properly, you need to have our plugin installed and to be using one of the browsers listed above.
- You can download our plugin within our platform by clicking the ‘Download Plug-in’ button on our left sidebar or by downloading it directly by using this link.
2. Start Reconciliation within QuickBooks Online
- We recommend starting your reconciliation within QuickBooks Online. You can find the reconciliation by following these instructions: Gear Box (top right of screen) > Tools > Reconcile.
- Choose the account that you’d like to reconcile, and make sure that your beginning balance, ending balance, and ending date are correct.
- Click the green button that says ‘Start Reconciliation’.
3. Export account reconciliation details into Equility
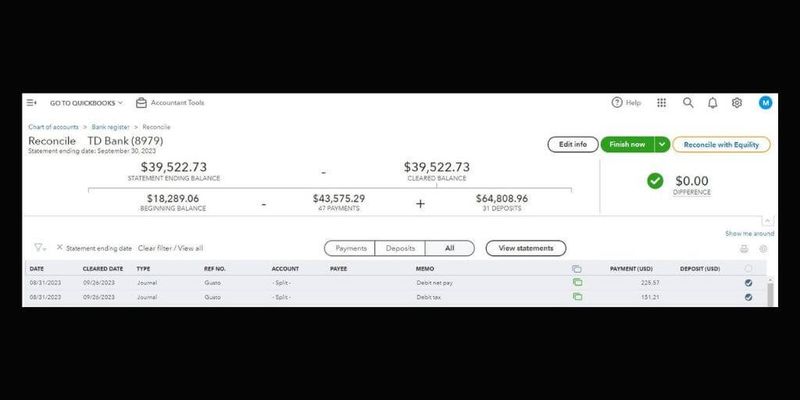
- If our plugin is properly installed and you’re logged into your account, then you should see a ‘Reconcile with Equility’ button on the top right of your screen. Once you click this button, your account reconciliation details will be imported to Equility:
4. Review imported data
- Please confirm that the following data was properly imported from QuickBooks Online:
- Account Name
- Reconciliation Range
- Beginning & Ending Balance
- If this information is correct, then please click the green ‘Next’ button at the bottom of your screen.
5. Confirm source data import settings
- In order to properly import your source data, you will need to let the app know a few details:
- Specify Date Range
- Please choose the number of days before and after a transaction date to look for potential matches. This is important because QuickBooks Online might have a check dated 09/01/23 (date written) but your bank account might show this check as dated 09/03/23 (date cleared). In this case, you’d need to choose at least ‘2 days’ to ensure that Equility can find the match.
- Import Options (Plaid or CSV)
- Plaid Import
- If you choose to use Plaid to automatically upload your transactions into Equility, you’ll need to click the green ‘Connect a new bank account’ button and enter your banking credentials. Once this is done, you can choose the bank account that you’d like us to import transactions from.
- If multiple accounts were connected, then simply choose the proper account from the list.
- As a caveat, the initial connection to Plaid usually takes ~5mins due to Plaid’s account verification process. Please be patient during this process, and simply click the account name if you’d like to check to see if the connection process has been finalized or not. Once your account is connected, this data pull will take less than 15secs on any future reconciliation.
- CSV Import
- If you choose to upload your banking transactions using a CSV file, simply click the green ‘Upload file’ button and you’ll be able to upload all of the transactions during your reconciliation period.
- As a caveat, please make sure that the total dollar amount of all of the uploaded transactions equals the difference between your beginning and ending balance. If it does not match, then it means that you have either added too many or too little transactions. If you have trouble with this, please contact [email protected] and we’ll be happy to assist!
- Plaid Import
- Click ‘Start Reconciliation’
- Once you’ve used one of the two methods above to import your transactions, simply click the ‘Start Reconciliation’ button and Equility will start its analysis.
- Specify Date Range
6. Review ‘Difference’ amount
- If your difference is $0.00, then it means that your account is reconciled properly and you can proceed to the ‘Export Results’ step.
- If your difference is not $0.00, then we will need to review why this is.
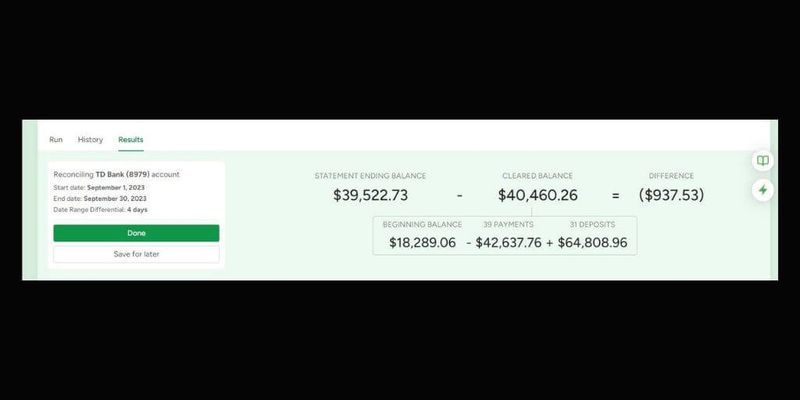
7. Review any unmatched source transactions
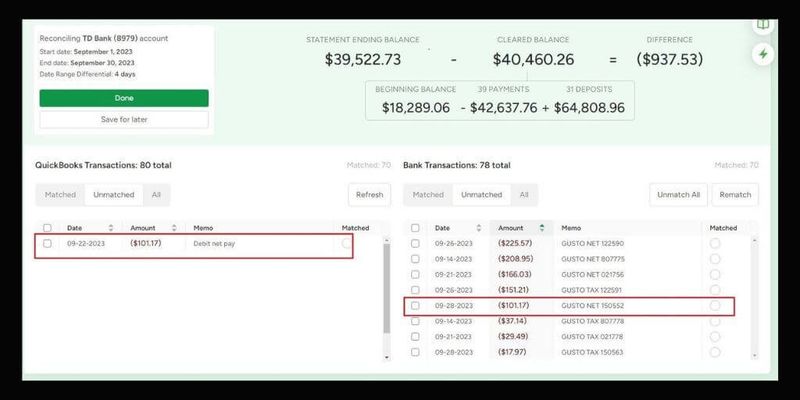
- If there are any unmatched source transactions (right side of screen) you’ll want to either match them to existing transactions that might have a date range differential that is larger than the range that you choose during your setup. In the example below, you’ll see that there is a $101.17 transaction that showed up on the bank statement as 09/28/23, however, the date used within QuickBooks Online is 09/22/23:
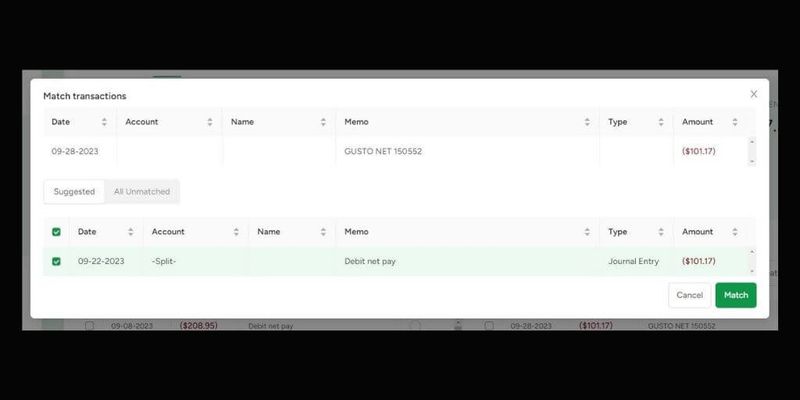
- In order to match the $101.17 transaction, you’ll simply click anywhere on the source transaction and a pop-up will appear that allows you to match the transactions:
- If you’re able to match all of your transactions and get to a difference of $0.00, then you can proceed to the ‘Export Results’ step. If not, then more than likely need to add some source transactions back to QuickBooks Online.
8. Add source transactions to QuickBooks Online
- If you’re difference is still not $0.00, then it is likely that you’re QuickBooks account is missing some source transactions. If you need to add source transactions back to QuickBooks Online, simply click the box to the left of the transaction, so that a green checkmark appears to the left of each transaction that you want to add to QuickBooks.
- Once all of the selected transactions get the difference to $0.00, then you’ll be ready to click the ‘Add to QuickBooks’ button:
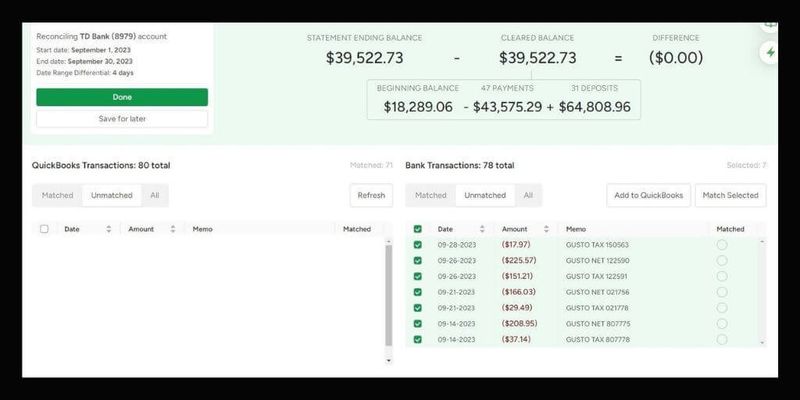
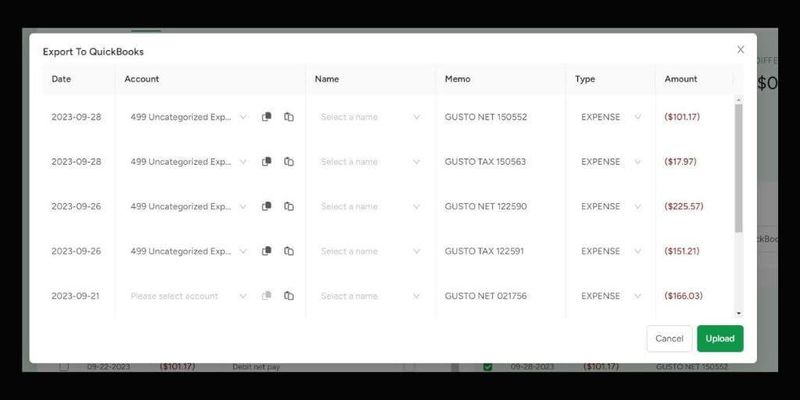
- This will prompt you to add a general ledger account name (mandatory) and a customer or vendor name (optional) to all transactions before adding them to QuickBooks Online. Once this is done, simply click the ‘Upload’ button and these transactions will be added to QuickBooks:
9. Export Results
- Once you’ve gotten your balance to $0.00 and added all necessary transactions to QuickBooks Online, simply click the ‘Done’ button to export your results to QuickBooks Online.
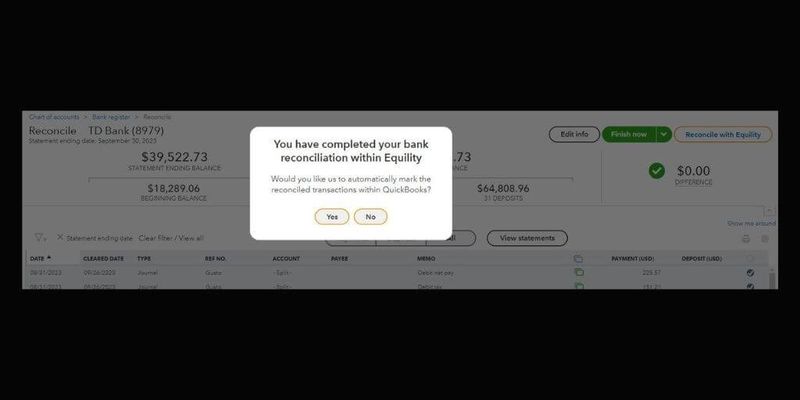
- Once the results are exported to QuickBooks Online, Equility will ask if you’d like for us to automatically mark the reconciled transactions with a blue checkmark (QuickBooks Online’s way of selecting a transaction). I would suggest clicking ‘Yes’ in order to expedite the reconciliation:
10. Relax and enjoy a simplified reconciliation!
- Great job! You’ve now familiarized yourself with Equility’s account reconciliation, and should be able to save 90% of your time going forward!
If you’d like to learn more about our account reconciliation automation feature, simply book a demo HERE!
Share :

Michael Nieto
As the owner of the financial consulting firm, Lanyap Financial, Michael helped businesses and lending institutions who needed help improving their financial operations and identifying areas of financial weakness.
Michael has since leveraged this experience to found the software startup, Equility, which is focused on providing businesses with a real-time, unbiased assessment of their accounting accuracy, at a fraction of the cost of hiring an external auditor.
Connect with Michael on LinkedIn.
Related Blogs
See All BlogsOptimize Your Financial Processes
Streamline financial reviews and bank reconciliation with our platform. Gain actionable insights, automate workflows, and manage everything seamlessly in one place.